

MAWi Spacewall - Enhance Your Visual Experience with Video Wall Software
Simplifying Digital Signage and
Videowall Creation
Android-based AV-over-IP connectivity solution for videowalls and digital signage screens. Reduce your support and maintenance utilize Android-based devices at the endpoints for videowalls and digital signage screens.


Trusted by world's leading brands


AV over IP Android-based Solution for
Digital Signage & Videowall

Overview
MAWi Spacewall allows you to set up a digital signage system, either for playing different content on each screen, group multiple screens to show the same content, set up a grid layout video wall with any size or scale, or even setting up creative video walls. This can all be done in minutes with just one PC.
MAWi Spacewall includes a software kit that turns any Android device into powerful AV over IP gear for digital signage and video walls setups in a simple, cost-effective way.
Simple Digital Solution for every Industry
- Production Lines
- Security and Op-Centers
- Retail Stores
- Education
- Healthcare
- Office Building

Production Line
Centrally control and manage multiple displays in your production line floor to show KPIs, Dashboards, Spreadsheets, and more.
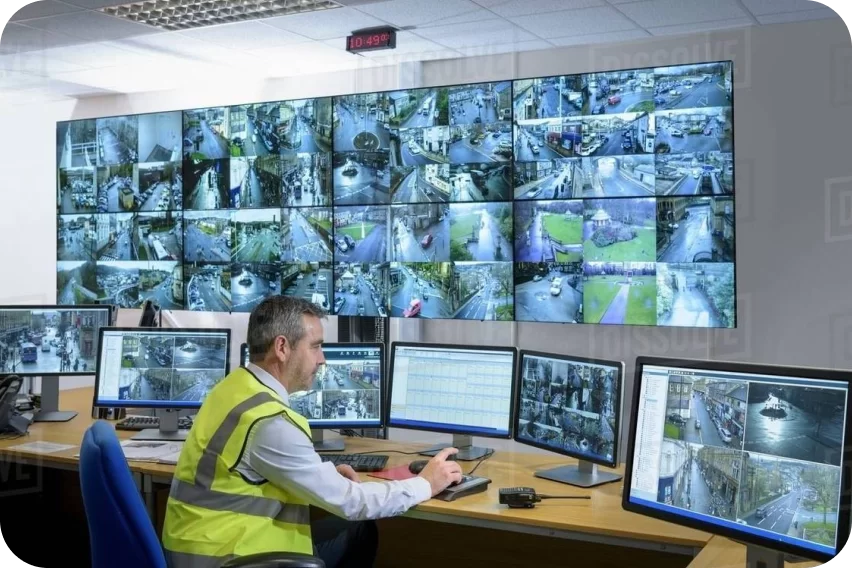
Security Operations
Show relevant incident data on a videowall coming from any source into any screen in real-time. Enable emergency operators to process information faster no matter where they are located.

Retail Stores
Bring customer experience at best by applying video wall in your retail store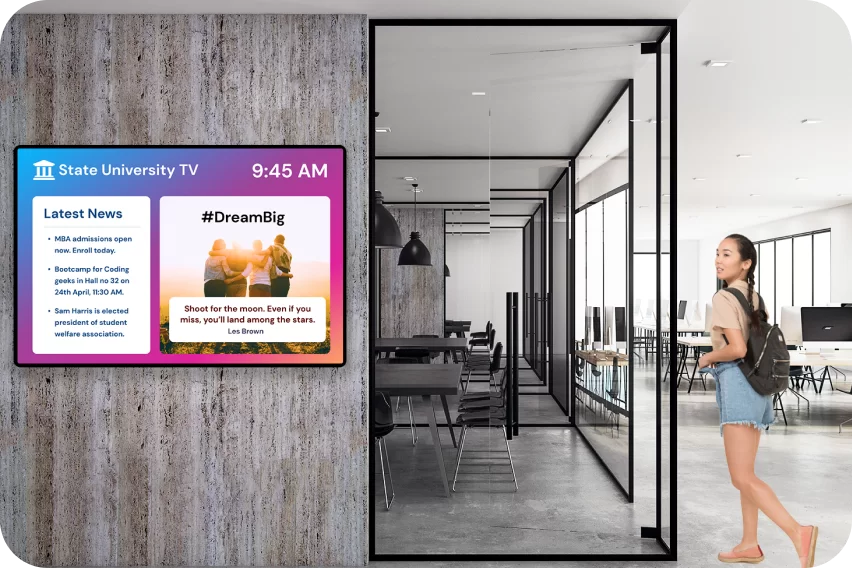
Education Sector
Display the desired content across multiple digital bulletin boards, in different locations around your school or university. Easily play any type of content: PowerPoint presentations, URLs, Videos, and much more.

Healthcare Sector
Display all types of relevant information for patients or staff, in multiple locations, utilizing an easy-to-use browser-based management console.

Office Spaces
Keep your employees, visitors, customers, and suppliers informed and involved using digital signage displays.
For more information, contact us:

Powerful Features
- Use any Android-based device as an end-point: MAWi Player, Android TV box, or even a smart TV.
- Use 4K screens and connect them over a wired or wireless Local Area Network.
- Play different content on each screen.
- Create a grid layout video wall in just a few minutes.
- Align your screens anywhere on a canvas and rotate them in any angle.
- Group multiple screens to show the same content.
Navigating the MAWi System
Multi-Screen PowerPoint: Playing Multiple Presentations on Separate Screens from a Single PC over the LAN
Displaying Dashboards and KPIs Across Multiple Screens using MAWi from a single PC over the network
Seamless Video Playback: Playing Videos on Multiple Displays with MAWi digital signage system
Effortless YouTube Video Playback: Playing Videos on Multiple MAWi-Controlled Screens
Creating and Displaying Playlists with Multiple Items on MAWi-Controlled Screens
Mastering Scheduling in MAWi: A Comprehensive Tutorial for Efficient Playlist Management
Play any type of content on your displays, whether it’s a standard file or a dedicated application such as SCADA, CCTV, etc. For more details
Mastering the Local Playlist Feature – Unleash the Power of Customized Content!
Easy Screen Control: Manage Multiple Screens Remotely with a User-Friendly Browser-Based Interface
How it works?
Connect
Link each screen to an endpoint devices such as: MAWi Players, Android TV box, or a smart TV that is running with Android operating system.
Control
Using a simple browser-based console, you can have: individual displays, simultaneously play cloned content, grid video, or creative video walls with collage-like multi-sized screens.
Play
Use your system to control the content shown, on-site or remotely, through the MAWi management console.
Unboxing the MAWi Player
MAWi Player is our own branded Android-based device that comes all equipped and set up with our app for immediate and out-of-the-box support of MAWi.
Why Customers Love MAWi
Full Control
Manage multiple screens and video walls across multiple locations.
Schedule Playlists
Efficiently and easily schedule playlists to run at specific times or as part of a scheduled task.
Video Walls made easy
Configure video walls with multiple zones and creative layouts
On premise solution
Stream confidential media files and data over LAN, VPN, WAN, or the Web.
Real-Time Visibility
Observe and control remote screens in real-time.
Set Permissions
Manage user roles and permissions
Fully Responsive
Remotely manage the screens from any web browser on a computer, tablet, or smartphone.
Easy Integration
Integrate with other systems using the REST API architecture.
MAWi Spacewall FAQs
The key differences between video wall software, such as MAWi Spacewall, and regular hardware controllers are in setup, flexibility, and features.
Hardware Video Wall Controllers: These devices link several screens to create a video wall. They handle the distribution of input signals. They are often less flexible and scalable. They need a big initial investment and a complex setup. Ideal for static setups, these systems are robust but inflexible.
Video Wall Software (e.g., MAWi Spacewall): This software offers a flexible and scalable option. MAWi Spacewall uses AV-over-IP tech. It lets Android devices connect to the video wall system. This cuts down on heavy hardware needs. It also lets you manage content easily on many screens using a simple PC interface. It supports different layouts and adjusts easily to various sizes. This makes updates simple, and often done remotely.
Hardware controllers are great for fixed installations. However, video wall software like MAWi Spacewall is more flexible. It’s scalable and cost-effective, making it ideal for places that need frequent content updates.
Yes! MAWi Spacewall lets users manage their video wall remotely. They can control, schedule, and update content from any location. You can update your content instantly, no matter if you’re in an office, a store, or an operation center. This way, your screens always show the most relevant information.
Online Monitors AnyWhere offers cloud-based convenience. You can access it remotely through a web interface. This makes it easy to manage displays in different locations. This is a game-changer for businesses. It offers flexibility and real-time updates. Plus, you don’t need to be there in person.
Video wall software is useful in many industries. It helps make exciting content for many screens. Here’s how different sectors benefit from MAWi Spacewall:
- Enterprises & Corporations: Ideal for messaging, branding, and digital displays in offices and meeting rooms. Video walls improve corporate messaging. They share important updates, keep an eye on KPIs, and feature branded content. This keeps employees informed and engaged.
- Retail & Hospitality: Draws in customers with ads, promotions, and engaging content on big digital screens. Retailers and hotels can stand out by using bold images and fun content. This helps them share special offers and make a lasting impression on customers.
- Control Rooms & Operation Centers: Key for monitoring events in real-time and making quick decisions. Security teams, emergency response units, and network operations centers need clear visuals of key data. This helps them react faster and work more efficiently.
- Education & Healthcare: Great for alerts on campus, directions, and sharing health tips. Schools and hospitals can benefit from video walls. They share announcements. They guide people. They present key health and safety messages. This keeps students, staff, and visitors updated.
- IT & AV Professionals: Lets you easily set up and manage digital signage networks. It’s flexible, affordable, and needs less hardware. IT teams can integrate video wall software into their existing systems with ease. This cuts costs and improves digital display capabilities in many places.
MAWi Spacewall makes it simple for businesses to set up great video walls. They don’t need to spend money on complicated, expensive setups.
A big plus of MAWi Spacewall is that it doesn’t require multiple media players or special hardware. Here’s what you need:
- A standard PC running Windows acts as the main control system. This removes the need for special hardware. It also makes setup easy and budget-friendly.
- A network connection lets you communicate with the video wall screens. A stable network ensures smooth data transfer and real-time updates without lag.
- Displays or TVs linked via AV-over-IP tech or HDMI-over-LAN. These options offer flexibility. Businesses can keep their current displays and still have great visuals.
- MAWi Spacewall software easily sets up, manages, and syncs your video wall. Its simple interface makes it easy to manage content, even for non-tech users.
Businesses can save a lot on installation and maintenance costs. Since it doesn’t need expensive hardware, it is a smart choice for those on a budget.
Good, smooth content is key for a great video wall experience. With MAWi Spacewall, you can get smooth performance by following these best practices:
- Use a strong network connection. A strong, quick network helps content load smoothly. A weak connection can lead to lag and delays on screens. This makes watching less enjoyable.
- Optimize media formats. Use the right video and image types. This helps stop buffering and avoid delays. Compressing large files keeps quality high. This helps ensure smooth playback on many screens.
- Use AV-over-IP technology. It lets you update content in real-time. You don’t need traditional media players. It provides clear video and reduces lag on all screens.
- Updating your MAWi Spacewall makes it work better and faster. Updates often add new features, fix security problems, and boost performance. These changes enhance how everything functions.
MAWi Spacewall gives you smooth, high-resolution output. You won’t face delays when showing live dashboards, ads, or control room visuals.
Absolutely! MAWi Spacewall fits a variety of screen sizes and resolutions. This lets businesses customize their video wall setups to fit their needs. The software modifies the layout for 4K UHD displays, ultra-wide monitors, and screens with mixed resolutions. This ensures you get the best viewing experience.
This flexibility makes it easy to create stunning, professional video walls. You can use grid layouts, creative mosaics, or asymmetrical designs. MAWi Spacewall fits perfectly in your setup. It works well for a big digital billboard or a sleek corporate display.


